photo 365.jpg
Showing posts with label cake pops. Show all posts

Tuesday, September 11, 2012

A Monsterous 4th Birthday Party!!


Yes, this year Ace turned 4 and with it we decided to have a monstrously themed and exciting birthday party to celebrate it.   It truly was his first 'kid party'  as last year we were in Mississippi and he had one guest his age at his party.  While fun it didn't have quite the chaotic and energetic feel of a true kid's birthday party and so this year we introduced him to that magic!   

What better way to have a monster party than to have eyeballs on... everything!   The wreath that greets the guests at the door, the table cloth, the party hats, the snack cups, in the jello!!! Eyes everywhere and especially on the cake!!! 

I apparently didn't take a picture of this on the door and I'm too lazy to do it at the moment.  :)


One of my favorite parts of his birthday party is the cake.  I love to try new techniques on cake and figure out fun new things to do.   This year I decided to try some piping.  His first birthday I learned how to tackle fondant,  his second was shaping cake and using spray paint food coloring (lots of fun!), and his third I used candy to create a story with the cake.    This year I used cake pops and piping to make a orange monster cake (and I also used some orange spray paint dye to give the orange a bit more pop!)   


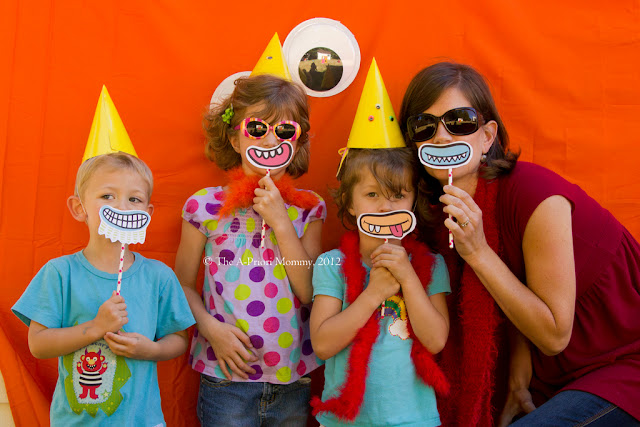
For games and activities I wanted the party to have a free flow and nothing that I'd need corral the 14 kids ranging in age from 4-10 months old.  So I set out ahead of time to have different activities that for the most part could be unsupervised and accomplished without much assistance.    So for that I created a photo booth and used Ace's camera he got for Christmas last year as the main device to take pictures with so the kids could do it themselves.   I found monster eyes at a local party store, used an orange sheet as the backdrop and then bought some monster mouths here and taped them to straws to hold them.   Tossed in a few accessories and created a few monster cut outs which I drew freehand and then painted the week leading up to the party.    Oh the fun!  

They look thrilled - lol I think Ace was not happy to be asked to stand still.  :) Kaylee was suspect.


The camera wandered away from the photobooth which is fine - it got a great perspective of the party!
 I created a coloring wall and drew on a large piece of paper several monsters that could be colored.   A lot of these monsters I drew using examples on the Internet, but I free handed them.   Spiced it up with the Happy Birthday and painted the letters using the water colors and stapled it to the fence.  A bucket of $1 worth of crayons and a whole activity made for under $2! :)  Quite the hit - although I am still finding a few crayon pieces in the yard!


The next activity was SLIME!  Yep set up a station and used the slime that Ace had already enjoyed playing with and put out a few aprons.  This activity probably could have used a bit more supervision as ultimately it ended up in a few kid's hair and used as a chasing device around the yard.... so since it is made with chemicals the dog probably shouldn't ingest there was a bit of a walking activity for some adults and myself later in the party to verify all large chunks were picked up... it was a hit though!

 Final activity that I put together was a bean bag toss.   I drew a monster and my husband constructed the actual bean bag tossing structure.   I also sewed 8 bean bags using some adorable monster fabric that I found at a local store and filled them with rice so if those broke open no big deal.   The kids loved this - and as I suspected having more bean bags would have been a good idea but I ran out of time!  :)


For both Ace and Mae (and myself, hehe) I made appliques and put them onto shirts for them to wear at the party.  Myself, I had some monster fur and hair extensions - we were quite a wild bunch! Dad was pretty 'normal'  :)   Ace had a great time and was running all over the place and at one point screamed as he was running around "THIS IS THE BEST DAY EVER!!!!"   Made me smile.    It really was a good day!


What party is complete without presents!!   Ace received his present earlier this month in the form of a play structure.  It was a huge hit with the kids at the party and both Ace and Mae LOVE it.   It was another free-form of entertainment to keep the kiddos happy!    His friends brought presents too and boy oh boy was he excited about all of them!  


As the party favor we had a station to 'Adopt a Monster'  - yes the day before I took four hours of my morning and made 15 monsters for the party guests to adopt and I did pretty well with my calculations and everyone (even Ace and Mae) had a monster to take home.  Whew!   Me and my mad skillz with felt.  hehe each monster was different.  Sadly the best photo I have of all of them is a cell phone pic, but better than nothing!  :)


and as the party came to a close I grabbed one more picture with my FOUR year old boy!  


***Courtesy reminder - if you wish to pin this to Pinterest PLEASE DO NOT PIN PHOTOS THAT CONTAIN FACES OF KIDS.  There are plenty of alternative pictures!   Thank you!!***

Wednesday, May 23, 2012

Ready to Pop - Baby Shower Decor

I love planning parties! I love themes, color schemes, and photographing it all! My friend Angie and myself were in charge of a baby shower last weekend and we went with the theme 'Ready to Pop'  our inspiration began with this pin and thus our color scheme of hot pinks, orange and yellow was established and after some talking through the theme we were set and the execution was a lot of fun!  

I went to the local craft store bought about $10 worth of cardstock and got to work with their die cut machine and began to prepare our decor for the party.  A few trips to Michaels (for the balloon tub, the plates, vase, and hot pink/orange tins - all 40% off, plus $15 off that with coupon!) and Target (for the table cloth, tray, frappacinno glasses, mini-waters, and both popcorn bowls...one is actually a planter), a final online trip to Amazon (for the straws, dart balloons, and cake pop covers) and a party theme is born!

The food and drinks were inspired by all things that 'pop' - Italian soda pop, popcorn chicken, pop rocks on the cupcakes, Pringles (Pop the top!), Tootsie pops, jalapeno poppers, and a delicious tasty mix of popcorn that Angie found and prepared!

You just can't have a 'Ready to Pop' party without balloons and the way we incorporated them was to fill a bucket full of balloons (I used dart balloons they pop really well!) that had wacky quotes from the book 'What to Expect in the First Year' - then at the bottom of the bucket was a copy of the book for the mommy to be.   We used this as a kick start activity to her opening presents. :)


Activities included bow and headband making the the area for said activity was equally as inspirational in thematic color as the rest of the space.  The $4.99 Target table cloth really made the space (and saved her gorgeous dining room table!)


Don't forget your Cake*POP*! As a thank you for coming!

We had a lot of fun plotting and planning - and I always love when a plan comes together so well!  If you're interested in the labels (2"x7.5") for the water  - feel free to message me and I will email you the PDF.  Stay tuned for a post about the event itself.  :)

Angie and I with our party girls*! 


* No my daughter's dress was not planned to match the theme.
I bought that for $3 on consignment a year ago and when
I went to get her dressed that morning I found it!
It was serendipitous!  My bracelets however were deliberate! :)

Friday, April 27, 2012

Babycakes Cake Pops

I recently purchased the Babycakes Cake Pop Maker and the Babycakes Cake Pop Cookbook.  I had previously seen the machine for sale and thought that would be neat, but I quickly dismissed it because I figured it wasn't worth $25 to just make cake pops every now and again.  Then I stumbled upon the cookbook and the fact that I can cook appetizers and other things specifically recipe-calibrated for this machine.   Hooray, I bought away! 

Did I buy for a specific event in mind?  No. Have I ever eaten a cake pop before in my life? No.  Do I think I'll get $25 worth of use of it? Yes, and then some! Are they delicious? Yum! 

For my first attempt making any cake pops this machine made it super easy!  I decided that I'd make some for our community group when it came our turn to bring dessert.   I used their lemon cake recipe.  Considering I didn't have an actual lemon as called by the recipe and only the lemon extract part, they were still quite yummy.  Can't wait to try it with a real lemon! :)


The recipe is super easy, relatively small, and easy to mix together.  After everything was combined, I tossed everything into a ziplock back and cut the end and created a easy device to feed the maker (and throw away when I'm done!)   Finding the right level of batter to create the perfect sphere took a bit trial and error but overall it was very easy.


I have to say that the cookbook does a great job walking you through the ins and outs of the cake pop maker.  Tips on just about anything you'd come across, and I greatly appreciated that.  The cake pops cook quickly only about 4 minutes and they were nice and fluffy.   They pop out of the maker pretty easily too!   Now after doing a lot of reading about 'cake pops'  I have been enlightened that the Babycakes Maker does not make 'traditional' cake pops - which apparently involve regular cake crumbled and a frosting mixtured rolled into a ball.   Forgive me if I say THANK GOODNESS for that!  That sounds disgusting to me.   I like the nice solid cake center.  :)

The book walks you through how best to affix the sticks to your cake pops.  Oddly enough you don't just jam the stick in the cake pops.   After I completed cooking them all (so about 4 rounds of using the maker) - I tossed them in a bowl and put them in the freezer for 15 minutes.   After that I melted a little candy, dipped the stick in it and then speared my cake balls and then I tossed all of those back in the freezer for 15 more minutes.   Then it was time for the fun stuff!


The cookbook offers several recipes for toppings to use on your cake pops, but for this time I chose to use the Wilton Candy Melts. The cookbook also walks through good techniques for using the candy melts to get a less drippy effect, etc..   This part is actually a lot of fun :)  I'm not sure why I found it so exciting, but it was.


Next up to add some fun color I broke out the sprinkles and got to shaking.  For things like sprinkles you want to do it while the candy is still wet.  For other decoration you want to wait for it to dry, just depends on the technique.   I love that the making of cake pops can be so multifaceted.


After making a good portion of the pops white with sprinkles, I thought that I would add in some hot pink dye to the melted candy to make some pink pops.   Apparently that was a grave error!  As soon as the two drops of dye hit the melted candy it turned into this grainy sandy mixture.  Eventually by adding a LOT more candies to the mix and melting those in it finally yielded back into a liquid form.   I guess that's one way to ensure that you buy the specific bag of colored candy melts!   So baker beware - candy melts don't like traditional food dye.  They require an oil based dye and Wilton makes some specifically for their candy melts (of course they do!.)


Ace was my taste tester... he loved them... as said with a mouth full of cake.   :)  Next up was cutting a piece of Styrofoam and then the rest was simple arrangement.  I left several off the sticks and some even completely uncandied for variety sake.  I put those in mini muffin cups and in the end they were all devoured.  Yum!


This was a very fun project and the maker cleaned up with an easy wipe down and thus clean up was a breeze.  :) Can't wait for more occasions to try out different recipes and decorating techniques!  Babycakes has not sponsored this blog, but I'd happily do business with them if they did want to.  Their cookbook is full of recipes and what I find even more invaluable than that is all of the great tips on perfecting your baking and decorating experience.   Stay tuned on a post about making meatballs in the maker!